Sunday, September 7, 2014

A Big Weekend. Part One.

Welp. The Gator Glide did not show up Friday as expected. This turned out to be OK.

Saturday morning, I ran to meet a good buddy in Jordan, MN to try for some early season Canadian Geese. It was not to be. With a full field of growing corn behind us and a field of alfalfa in front of us, there was no real reason for anything to land in our dekes. 

Which was OK as well. There was good company, lots of corny jokes and a beautiful sunrise to enjoy.

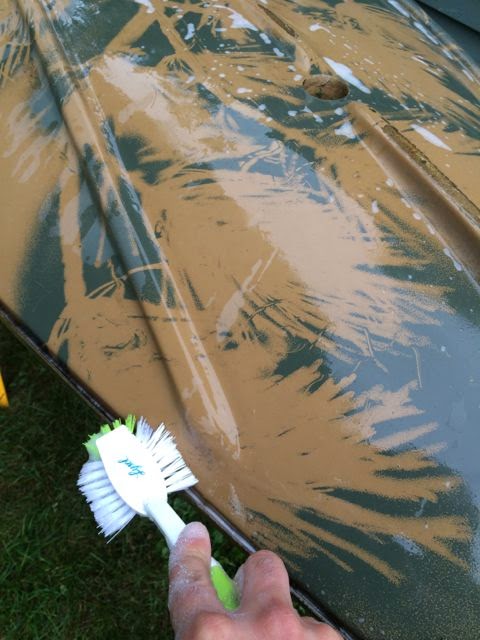
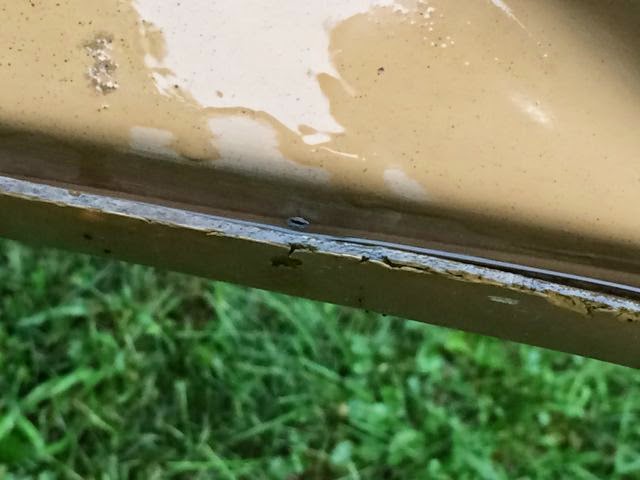
After I got home and took about a three hour nap, I woke to prep for the first coat of resin I'd be putting on the hull. One more light sand, then a warsh and then a wipe down with acetone.

I had West System's 105 resin (the basis on which the entire West System line is formed), the 206 slow hardener (figured it would be better to cook slow than fast) and the 422 barrier coat additive (provides additional moisture barrier protection to prevent blistering and also enhanced abrasion protection). I opted to get the pump system because...easy. I didn't want to mix things in a cup and try to eyeball anything. 


I was going to put some filler in it as well, but at the last minute decided there were enough additives going into the mix - no sense in adding more. 

Once mixed, I rolled the first coat on with a 7" - 3/8" nap roller. It started great. Then the pot started to kick off. As I was rolling on the last coat, the paint tray was laying in the grass steaming. Needless to say the part I did last turned out pretty lumpy. 

I smoothed as much as I could out with a foam roller, but the back half of the boat was a lost cause. It was clear I was in for some sanding once it cured. I decided just to leave well enough alone for the night.

Before my girlfriend and I went to dinner, the epoxy had cured to a slick surface. There were little raised particles where the roller had shedded.


So, as you can see, the epoxy on the front half of the boat went on smooth, the back half, not so much. A few chunks, lots of bumps. Agh. Best to go grab a Juicy LuLu at Lucky 13 and enjoy an Old Fashioned on the rocks. It was a long day.

Wednesday, September 3, 2014

Updates...

It has been too rainy/humid to attempt to get the first coat of resin on. So I sanded the hull a little more. 

Tomorrow is supposed to be better, so fingers crossed I get the first coats of resin on before the weekend because...

The Gator Glide is due to arrive this Friday, so that is exciting. Hoping to get it painted this weekend.

Sunday, August 31, 2014

Filling the Void

Thursday's strategy session complete, I have a short list of the actions I'll be performing on the hull:
  • Fill the void between deck and hull with marine grade epoxy putty.
  • Fill the deep cracks.
  • Reinforce and reshape the keel to original spec.
  • Put a decent coat of resin on the hull.
  • Finish coat with Gator Glide G4.
I started bright and early Saturday morning with a trip to West Marine. Once home, I set up shop and "pre-pared to re-pair." 

The epoxy was, on the whole, easy to work with. It's very goopy without using water as a surfactant to keep it from sticking to goddamn everything. I started applying it with nitrile gloves on, but running it over the jagged edges of fiberglass quickly made doing so a moot point. It was clear that I was going to have olive green fingernails for the rest of the weekend. 

I smoothed out the applied epoxy using water and my fingertips. A couple hours in, and I had the pruniest fingers ever. It took a couple hours to work epoxy into the void flush with the edge of the lip between the deck and hull. It also took a lot more material than I anticipated, leading to another trip to West Marine for more epoxy.

It took about three hours for the epoxy to fully cure. When it's still somewhat soft, it sands very easily, but will clog up sandpaper like nothing else. I then was forced to be done for the day due to a sudden downpour.

Sunday morning, with Saturday's rain still dripping off the craft, I set to sanding. Using a block and 60 grit sandpaper, I managed to smooth out about 1/8 of the lip in about a half an hour. It was clear that this was a job for an orbital sander.

The sander made quick work of the rough and uneven spots where the epoxy was applied. I was afraid of gouging the boat up with the sander, but with the slow start technology and variable speed, it was easy to start and stop sanding without over sanding. The dust collection bag was also a nice touch. It wasn't 100% dust-free, but it made a pretty sizable difference.

Once the lip was sanded, I was impressed with how much more solid that area was. Thinking back, I probably should have started with liquid epoxy to fully encase the interior of the void, but it looks like the marine epoxy putty is going to be pretty impermeable. It has adhered very strongly to all applied surfaces.


Remember, it used to look like this:


I then applied the epoxy putty to the keel to build it up back to original spec. I smoothed it out with a plastic spreader and water. It still took a significant amount of sanding to get the shape correct again. It's pretty close, and I think the next steps will even everything out even further.


Next steps: applying finishes to the hull. This will consist of a couple coats of West System 105, maybe with some barrier coat additive for further impermeability, then the Gator Glide.

Hopefully it's a bit less humid this week.

Thursday, August 28, 2014

Determine Your Condition Before Proceeding

I heard back from Carsten's regarding fixing the boat. They suggested re-gel coating over the scratches to fill, and no, the rivets are not crucial at this point.

I assume this is because the top and bottom halves of the boat are bonded together somehow?

Anyhow - armed with that information, I have decided to break this project into two halves:
  1. The hull.
  2. The deck/cockpit.
I will completely finish the hull before flipping it over to overhaul the deck and cockpit.

Tonight, I started to determine the full condition of the hull of the Pintail.

The hull is in structurally sound condition, but:
  • There are several deep scratches that need to be patched.
  • The keel is worn down to the fiberglass on one end.
  • The rivets are all popped. 
  • Where the rivets have popped, the fiberglass is cracked and/or missing.
  • There is a gap between the deck and the hull.
  • There is crazing and spiderweb cracking all over the hull.
I started by simply washing the hull with some Dawn dish detergent, water and a scrub brush. It took several five gallon pails of water (no hose/pressure washer at the shack) and lots of elbow grease to get all of the accumulated muck out of the gap between deck and hull.


I then pulled out all of the rivets that remained in the outside lip of the deck. I kept thinking to myself "Do no harm." No sense in making more work for myself than I already have ahead of me.

I spent an inordinate amount of time before I started this little undertaking on various forums devoted to the repair and restoration of fiberglass boats.

I found great information on the following web sites:


Once the rivets were pulled, I wiped the hull down with acetone. I doubted that after 12 seasons of duck hunting that there was any mold release agent left in the gel coat, but I wanted to be thorough and give myself the best possible surface for the following repairs to adhere to. Then, everything got sanded with a 60 grit sanding sponge until the fiberglass was "cloudy and dull." You're not really removing a ton of material, just roughing up the surface at this point.

Once that was done, I washed and rinsed it again with the Dawn, then gave it a once over with an acetone soaked rag.

Time to strategize next steps over a beer!

Wednesday, August 27, 2014

Undertaking a Little Project

Every late August, as the sun's bright summer light gives way to autumn's golden glow, I start to get that little nudge that says "hunting season is right around the corner."

That leads to all manner of preparation in order to be ready for late September...this year is no different.

Last year it was all about building a new deer hunting shotgun and fixing up an old 12' x 12' canvas tent to set up deer camp on the farm. This year I finally decided I had enough of dragging a 10' jon boat through 200 yards of thick cattails and muskrat runs to get to my secret duck pond. I've always wanted a sleek little duck boat and this year is the year I would finally get one.

I've obsessed about this particular boat since I was 17.

There were always better to spend $910.00 (plus shipping) on. Not that it's a kingly sum by any means, but when my last boat cost $150 and got me through a solid 15+ years of duck hunting, it seemed a little steep.

So, I found a used one on Craigslist. $550, never shot out of, the seller said. Mainly used as a boat "to tow behind my big boat for setting decoys out of."

OK, I thought, I'll take the plunge. 

I drove up to the little hamlet of Columbus Township to pick up my (new to me) Carsten's Pintail. After a little chat about changing flyways we had the thirteen foot boat upside down on the top of my Jeep and strapped down. I gave the boat the hairy eyeball and it didn't look too bad. It looked all of its twelve years of age, nothing, I thought, that a little TLC wouldn't fix.

A quick note about the little handle on Jeep Wrangler's hoods. They are not cargo tie down points. 

I got it home and asked my girlfriend to help me get it off the top of the Jeep's roof. She looked a little amused as I struggled to keep it from rolling off the top of the Jeep and onto the driveway. Turns out it's more of a one person ballet. I dragged it to the back of the shack, set it up on sawhorses and then really gave it a looking over.


It was at this point that my girlfriend suggested that maybe I should have negotiated a little more instead of just handing over the $550.

Yes, there are some scratches...I have no idea how ALL the rivets are sheared off...yes, the gel coat is spiderwebbed in spots. But the hull is solid, I maintained, giving it a little tap with my knuckle, despite this giant gap between the deck and the hull. Yes, I have a little work to do...

I put an email in to Carsten's regarding the rivets. I don't know what they do or if they need to be replaced. I will say that since this boat was probably outside all year for twelve years, it's in pretty decent shape. The design is really nice, too. Well thought out. Carsten's does make a fine product.

I'm guessing that by the time this is finished, I will have spent at least as much on the used boat, supplies and in my time to far surpass what I would have spent on a new boat. I also feel a little bad for not giving my money to a storied Minnesota, USA company - but I'm undertaking this because it's good for a man to have projects and this will give me the opportunity right out of the box to make the boat my own (and I still need the extra seat and gun rack from Carsten's, so they'll be getting a little dough out of me at least).

Hopefully at the end of the day, the good folks at Carsten's will be proud that one of their little boats is still going to be on the water.

We'll see how it goes!